1 To humans belong the plans of the heart, but from the LORD comes the proper answer of the tongue. 2 All a person’s ways seem pure to them, but motives are weighed by the LORD. 3 Commit to the LORD whatever you do, and he will establish your plans. 4 The LORD works out everything to its proper end— even the wicked for a day of disaster. 5 The LORD detests all the proud of heart. Be sure of this: They will not go unpunished. 6 Through love and faithfulness sin is atoned for; through the fear of the LORD evil is avoided. 7 When the LORD takes pleasure in anyone’s way, he causes their enemies to make peace with them. 8 Better a little with righteousness than much gain with injustice. 9 In their hearts humans plan their course, but the LORD establishes their steps. 10 The lips of a king speak as an oracle, and his mouth does not betray justice. 11 Honest scales and balances belong to the LORD; all the weights in the bag are of his making. 12 Kings detest wrongdoing, for a throne is established through righteousness. 13 Kings take pleasure in honest lips; they value the one who speaks what is right. 14 A king’s wrath is a messenger of death, but the wise will appease it. 15 When a king’s face brightens, it means life; his favor is like a rain cloud in spring. 16 How much better to get wisdom than gold, to get insight rather than silver! 17 The highway of the upright avoids evil; those who guard their ways preserve their lives. 18 Pride goes before destruction, a haughty spirit before a fall. 19 Better to be lowly in spirit along with the oppressed than to share plunder with the proud. 20 Whoever gives heed to instruction prospers,and blessed is the one who trusts in the LORD. 21 The wise in heart are called discerning, and gracious words promote instruction. 22 Prudence is a fountain of life to the prudent, but folly brings punishment to fools. 23 The hearts of the wise make their mouths prudent, and their lips promote instruction. 24 Gracious words are a honeycomb, sweet to the soul and healing to the bones. 25 There is a way that appears to be right, but in the end it leads to death. 26 The appetite of laborers works for them; their hunger drives them on. 27 A scoundrel plots evil, and on their lips it is like a scorching fire. 28 A perverse person stirs up conflict, and a gossip separates close friends. 29 A violent person entices their neighbor and leads them down a path that is not good. 30 Whoever winks with their eye is plotting perversity; whoever purses their lips is bent on evil. 31 Gray hair is a crown of splendor; it is attained in the way of righteousness. 32 Better a patient person than a warrior, one with self-control than one who takes a city. 33 The lot is cast into the lap, but its every decision is from the LORD.
I don’t know about anyone else, but this is the onliest way I make any major decisions in my life, as I consult the Word of God, and then go to my knees and seek him who has his purposive will laid out for me. I also consider other scriptures which are relevant to whatever decision I am facing. (Philippians 2:13) Truly he is the One who gives both the WILL and the Do to please him. (of his good pleasure).
Opening this link will take one to the Spring Holidays of the Jewish people and the death, burial, resurrection, showing of his passion, his ascension and the gift of the Holy Spirit he had promised his followers/believers. It lines up exactly with Old Testament scriptures. The amazing fact of all this is what is stated in Acts 1:11, and he shall come again in like manner. Most Christians believe this promise but don’t really live like they believe it. They also have to look at Hebrews 9:28 which also confirms what he told his disciples or followers. There is a catch in that verse though, at least I consider it a catch, it is, “Unto them that LOOK for Him”, so one must be actively looking for him to appear, and anyone knows if you’re looking for someone to come back again, you live your life accordingly. So many folks today do not live their lives as though they are waiting for him to appear again, to come after them, as it were. We must be careful to live our lives as though he is coming back at any moment and not be found wanting.
We need to be thinking clear thoughts and making clear well thought out decisions in this age of fast paced thinking we are part of. If you’re anything like me, you’re thought process does not permit you to believe you are part of this world, but here as a visitor, this society is geared to prepare you for the next world. The next world of course is none other than that which was promised by Christ when he left here, shortly after being crucified, rising again from the dead, and showing forth his passion for the world for 40 days before he arose to go back to the glory he had originally left.
I consider this Earth Walk as merely preparation for the Next World. This is a place where I am being tested to see if I measure up to whether or not I have whatever it is going to take, to live in that eternal world he promised he went to prepare for us. It starts by not conforming to this world, recognizing I am but a pilgrim traveling through this world, on my way to the real world of my salvation. I have been saved, am going through all processes of remaining saved, and I shall be fully saved at the end. (He that endureth unto the end, the same shall be saved (Matthew 24:13, Mark 13:13)
So folks, clear thinking is indeed in order to survive this world, long enough to receive the promise of eternal life he promised when he left here. I am speaking of the LORD Jesus Christ, or Jesus the Christ, or Yeshuah ha Mashiaach, or whatever other name you may know my Lord and Savior by. He is my God, my Savior, my Redeemer, the Owner/Master, Master Builder, Creator, the One who gave his life for me. He has gone to prepare a place for me and anyone else who believes as I do, and he has promised to come back and receive me unto himself, wherein I shall spend Eternity with him.
Someone asked me recently why it is I study the Hebrew Scriptures so fervently. I told them the writings and the prophets seem to be in agreement with things I grew up with inasmuch as teachings are concerned. Certainly the Hebrew language is more in keeping with the Old Bodewadmimwen than this English everyone speaks today.
I have identified with the Hebrews/Jewish people on more than one occasion and shall continue studying their scriptural way of doing things and expressing what their prophets delivered to them at one time.
This Guide is intended as a general introduction to planting and raising seeds which are available from Baker Creek Heirloom Seeds. While we have endeavored to answer as many questions as possible, no document of this size can hope to be all encompassing. We therefore encourage you to seek additional locally-specific information from your agricultural or university extension office.
Begin at the beginning
As early as possible in the year, prepare a list of the vegetables, flowers, and herbs you want to grow. Obtain the seed for them or, if too late to start your own plants this year, opt for locally-purchased plants and plan to be earlier next year. Plants which mature quickly such as beans, leaf lettuce, radishes, etc. can be planted even if you purchase your seed well past the last frost date in your area. It is also possible to grow a second crop or Fall Garden by starting many seedlings in late June and July for planting and harvesting up to the First Fall Frost. Plan out on paper where in the garden you will put your plants, taking advantage of windbreaks, shade, and sunlight hours. Save the paper and add notes as your garden progresses. A full and accurate garden record is as essential a tool as a spade or trowel.
The importance of the Last Frost Date in Spring
There are two categories of plants in the garden: Frost tender plants which will be killed by temperatures of 32 degrees or less. This group is further divided into those which must be started indoors so that they have grown into small plants before planting after the last Spring frost and those which will simply be direct seeded into the garden soil after the frost date. Hardy plants will not be killed if your early Spring temperatures drop into the lower 30’s. These can be planted directly in cool soils without pre-starting in the house.
Find out your Last Frost Date
You can ask gardening neighbors, call any local agricultural or university extension offices, ask at a garden supply or nursery or at the feed store, or consult a map through several on-line sources. With this date you can now work backwards through the early Spring months and work out what needs to be started and when.
When (and Where) to start your seeds
Vegetable
Weeks Before Last Frost Date
Start indoors and transfer outdoors after last frost (These plants are tender)
Chives; Globe Artichoke; Leeks; Onions;
12
Celery;
10
Eggplant; Peppers; Tomatillo; Tomatoes;
8
Broccoli; Cabbage; Cauliflower;
6
Cucmbers; Melons; Okra; Pumpkins; Squash;
3
Direct Seed in garden before last frost (These plants are hardy)
Weeks before last frost date
Onion Sets; Seed Potatoes;
6
Kale; Kohlrabi; Spinach; Turnips; Mustard;
5
Beets; Carrots; Chinese Cabbage; Endive; Peas (English); Radish;
4
Lettuce (all types); Swiss Chard;
2
Direct seed in garden after last frost (Tender)
Weeks after last frost date
Beans; Celeriac; Cowpeas;
1-2
Corn; Muskmelon; Watermelon; Okra;
2
Pumpkins; Squash;
2
Cucumbers; Peanuts; Amaranth;
2
Starting Seeds Indoors
Collect the necessary materials for starting seeds. You will need pots or other containers, soil medium, and plastic bags or wrap. Containers can be anything from yogurt cups to purchased flowerpots, but all should have drainage holes in the bottom so there is adequate drainage for your seedlings. Egg cartons are too shallow; there should be about 3” of soil medium in the container to encourage proper growth of the young roots. For “soil” buy bags of seed starting mixture (note to Organic Growers – may contain chemical fertilizers; read the bag carefully) or make your own. Good soil-less mixes can be made from 50% peat moss with 50% vermiculite, or buy bags of potting soil and add 50% peat moss: that is 1 quart peat moss to 2 quarts potting soil. Potting soil used by itself is too heavy and packs down easily. Garden soil (dirt), in addition to being too heavy, contains many microbes, including some disease bacteria which may attack your young plants, causing early death.
Moisten all mixes before planting the seeds. Plastic bags or wrap will keep the moisture in your seed trays and aid in faster germination. Fill your containers with the moistened mix and press it down into the container so that you have a firm bed for the seeds. You don’t want them to fall down to the bottom of the container and not germinate! With a stick or pencil, create a little trench in the soil or punch a small row of shallow holes. Very important note: most seeds should be buried to a depth of one or two times the diameter of the seed. For instance, this means that small seeds like tomatoes should barely be a quarter of an inch below the surface of the soil. Remember that in nature most seeds just lie on the surface of the ground before germinating. Having planted your seeds, take care not to overcrowd them; very lightly press a little more soil mixture on top and lightly mist with water. Place the whole container in a clear plastic bag or under a sheet of plastic wrap. Remove it immediately after the first seed germinates.
In addition to requiring a soil medium and water to grow, seeds also require warmth and light. A warm spot in the house, such as on top of the refrigerator, will provide the heat. Seedling heating mats with thermostatic controls may be purchased. Once the seedlings have emerged, light becomes extremely important. A sunny windowsill may have to suffice, (remember to turn the seed trays every other day), but ideally a pair of low-cost fluorescent shop lights should be suspended on chains about 2 to 4 inches above the growing tops of the seedlings. Turn the light on for up to 16 hours per day and then let the plants rest during 8 hours of darkness. Keep the seedlings warm during the day hours (70º) and reduce the temperature to 60º at night. Lightly water when the soil feels dry to the touch using water at room temperature. Check often as soil mix dries out quickly in heated indoor conditions.
When the seedlings have grown their first set of true leaves (which are the 3rd and 4th to emerge), they should be fed with a diluted liquid feed. This can be a commercial houseplant food diluted to 50% weakness with extra water, or a fish and kelp emulsion organic food (note: this will smell “fishy” for some hours after use). At this time also, seedlings can be moved up into larger containers if needed. When transplanting seedlings into larger containers, hold the young plant by the leaves and not by the stem. The leaves, if damaged, can be replaced as the plant grows taller, but if the stem is damaged by rough handling the plant will likely die.
What went wrong with my seedlings?
Didn’t germinate at all or very few germinated–There are a few possible causes to this problem. The first may be old seed and/or kept in poor storage conditions. Seed sold commercially is sold for use in that season and has been tested and shown to have a germination rate of at least 80%. Seed that has been kept for more than a year in less than ideal conditions (for instance in a warm or moist place) may then not germinate up to the known percentage. Some seeds take a very long time to germinate, and perhaps you have simply not waited long enough—celery and parsley seed, for instance, can take at least 21 days to germinate. If your soil temperature is too cool, seeds will take a long time to break their dormancy. Eggplants and peppers like temperatures around 75º to 80º and slow considerably when started in cooler conditions. Excessive watering may have rotted the seed in the soil mix before it even had a chance to sprout. The soil mix should be damp but not dripping.
Seedlings that grow normally and then drop over or that show signs of fungus or mold are likely victims of dampening off, a bacteria-borne disease. To avoid this condition, always use a soil-less mix which is sterile and rinse thoroughly all containers with a bleach and water solution (1 part bleach to 10 parts water) before use. Dip your tools in this same solution and ensure that your hands are always clean when handling seedlings, especially if coming in from outside gardening chores. A chemical solution of Benomyl fungicide can be used in greenhouse environments to control these diseases. Water from the bottom whenever possible. This means standing the pots in a shallow pan of water and letting them soak up the liquid rather than using a watering can.
Pot-bound seedlings have been growing too long in a container which is too small. Likely all nutrients in the soil have been exhausted and the plant needs to be moved into a larger container with fresh mix around the roots. Take care not to damage the roots when transplanting, especially if they have gone through the drainage holes in the bottom of your pots!
Seedlings that are too leggy or tall have been grown without sufficient light, so the plant has stretched out reaching for it. Try to get the seedlings into a place where light is available for more hours per day. Tall tomato plants can be buried deeply when transferring into larger pots or when being moved out to the garden. Any buried stem will develop roots along its length.
Yellowed or sickly looking seedlings may need feeding or less watering. Allow the mix to dry out and then feed with a liquid food at diluted strength.
Hardening off
Seedlings that have been grown indoors need time to transition into the outside world. If possible, move the trays of young plants outside for some hours of daylight and then return them to the protection of the house at night. A selected spot should be out of direct wind or sun and preferably not likely to be soaked by heavy rain. After a week of this protected environment, the seedlings should be ready to be planted in the garden beds.
How to plant seedlings in the garden
Once the plants have been hardened off and the danger of frost is past (if applicable) take the seedlings and a full watering can out to the row or bed. Using the spacing chart provided in the next section, dig a small hole. Place the seedling in the ground at about the height it was growing in the pot (except tomatoes, which can be buried or laid on an angle). Press the earth down firmly and water well. Continue watering during the next few days. In some areas, cutworms are a problem. They will eat the seedling off at ground level during the night and then burrow into the ground to rest. Place a small strip (2” x 6”) of newspaper around the stem as a collar. This will decay into the soil but thwart the cutworms’ attack.
Plant seed and seedlings according to the following row spacing chart
if you are using rows in your vegetable garden. If your direct-sown seedlings come up too close together based on this chart, carefully pull out additional ones to achieve the desired spacing.
Musk Melons; Squash (Summer and Winter); Zucchini;
60
Pumpkins;
96
Watermelons;
Other methods of setting out plants Wide row planting – In this method, a bed approximately 30” wide is planted by broadcasting (scattering) the seed across it. This works well in salad gardens where a mix of small greens is harvested at a very immature stage. Harvesting may be done by thinning the bed; that is, pulling out some of the plants growing together in a cluster, or by use of a pair of scissors snipping here and there along the bed to obtain enough salad for the desired use. Larger vegetable drops such as cabbage can also be wide row planted using a staggered pattern of the rows and allowing the minimum row distance per plant between specimens in each direction. In the case of cabbage, this would be 12” on center in a diamond shaped pattern.
Raised beds – Instead of planting at ground level, the surface of the soil is raised above the walkways. Soil may be simply mounded up, or retained within artificial walls of concrete blocks, cut down wooden pallets, old timbers, etc. Make them a size that you can reach into without difficulty, for instance 4 ft. wide by 12 ft. long with access on all sides. Compost and other soil improvements are distributed inside the raised area, and the soil is never compacted by foot traffic. Set out plants in a grid pattern to take advantage of all useable space. These raised beds may be ideal for use by a gardener with mobility problems.
Container gardening – Ideal for gardeners in city environments or for patio gardens. Take extra large plant tubs or half whisky barrels and fill with a good quality garden or potting soil. Allow for good drainage so that roots do not become waterlogged. Seeds can be direct seeded into a barrel or transplanted from seedlings. Put taller plants towards the back so as not to overshadow smaller ones. Feed and water more often as roots are in competition in this limited space. Promptly remove any insect pests or diseased plants to avoid damage to the whole collection.
Water and feed regularly
Just as you fed and watered your seedlings in the house, they will continue to need attention in the garden. Perhaps it isn’t raining much this summer, and your plants are drooping in the early morning. This is a sure sign that watering is needed. Most plants will wilt in the hot afternoons of summer but recover overnight. If you are using a sprinkler system and hose, keep a rain gauge in the garden to ensure that all plants receive up to an inch. Do this once a week rather than watering daily in small amounts. Do not water in the midday or heat of the afternoon; too much will be lost to evaporation. Spread mulch around the plants to cool the soil and slow down drying. Use black plastic or grass clippings or compost. These will also choke out weeds. Organic gardeners can feed their vegetables with liquid or dried fish and kelp products and regular side dressings of compost. Do not put manures directly on the garden plants as it is too strong and will damage or kill them. Non-organic gardeners can purchase chemical fertilizers in granular or liquid form and apply per the instructions, taking care not to touch the leaves or stems, as these are also concentrated products and can burn your plants.
Provide support to strong plants
Tall or vining plants such as pole beans, tomatoes, cucumbers, and peas will require staking or other means of support. Peas can be grown on discarded brush stuck in along the rows or on meshes or nets specially sold for the purpose. Tomato cages can be bought commercially but are often too small for heirloom varieties which can often grow to 6 or more feet in height. Install fence posts or lengths of galvanized wire in advance of the plants needing them so that you will be ready to tie up your sprawling vines before they set fruit.
How long till harvest?
The following table gives approximate days between planting in the garden and harvest. Note that plants which are set out as seedlings (tomatoes, peppers, eggplants, cabbage, broccoli, etc.) do not include the time spent growing indoors before setting out in the garden.
While there are commercial insect sprays available at all garden centers, most will have the disadvantage of also killing beneficial insects which are so important to the life of your garden. Rather than introduce these products to your eco-system, take time to look at the plants and discover if there is any damage and what might be the cause. The white cabbage butterfly can be seen flitting about between your cabbage plants in June. Just turn over the leaves and search out the newly laid egg clusters. Wipe them off with your fingers or a cloth and you have prevented damage from this pest. Look at potato leaves for the eggs of the Colorado Potato Beetle which is a small black and white striped insect. Caterpillars may be removed and crushed underfoot. Look for small piles of green “manure” on your plant leaves in the early morning and you will often find the caterpillar tucked under a shady leaf for the day. Tomato Hornworms can easily be detected simply by the amount of damage done in one night. Find this large pale green worm and dispatch him summarily underfoot or feed him to your chickens!
Weeds
Pull weeds daily or at least while they are small. On no account should you let weeds go to seed in the garden, as your job next year will be that much harder. If at all possible be sure to pull the entire plant, including the root, as many weeds can re-grow from severed root stock if it is not all removed. Remember that a weed is any plant not growing in the desired location, so a volunteer tomato plant growing in your onion bed should be pulled out and discarded or transplanted into the tomato row.
Cover Crops
In dormant places in the garden or after harvesting an early crop, sow a plant which will be dug back into the soil as an improvement. Examples of such “cover crops” or “green manures” would be alfalfa, buckwheat, Sudangrass, hairy vetch, annual rye grass, or a legume crop such as cow or field peas or soybeans. Broadcast seed widely over the area and allow the plants to come up thickly so as to choke weeds and provide a living canopy over the soil surface. Roto-till or scythe and then dig the residues into the ground to improve your soil organically by providing food for earthworms and much needed plant material (humus) in the soil’s composition. Sandy soils will hold moisture with more humus, and clay soils are aerated or broken down with addition of humus. Be sure to allow enough time for your cover crops to break down in the soil before replanting vegetables.
Making Compost
In one corner of every good garden there should be a compost pile ready to receive weeds and crop residues. Do not leave cabbage leaves, corn stalks, or other plant leavings standing in the garden as they will provide habitats for over-wintering insect pests and diseases. Either loosely stack plant material in a heap or purchase or make your own compost container. A length of open weave wire fence can be formed into a circle about 3 to 4 ft. across and preferably no higher than 3 ft. on the sides. To make compost you need three things: organic matter, air, and water. Damp down the layers as you build the pile with a hose or watering can. In dry periods water the entire pile if rain is not expected to fall. The pile should be damp but not saturated.
Your compost “circle” should be filled by alternating layers of organic matter: dry brown (carbon) and moist green (nitrogen) materials (for example, used hay or straw between layers of grass clippings and weeds). Do not make any layer more than 4” deep, or you may smother the pile so that it cannot break down properly and instead merely decays in a stinking mess. Allow air to circulate through the container and lay branches or poles through the pile which can be removed later to produce air channels. Add kitchen scraps but no meat, which will encourage raiding animals. Barnyard manure may be added in small quantities to the various layers, but please no dog, cat, or human wastes because of the danger of pathogens.
If possible turn the compost once during the summer season; that is, prepare another such “circle” or bin, and fork the full heap over into the empty one. This will speed up the breakdown of the material in the pile. If you cannot turn your compost, simply let it sit through one garden season and winter and use it next Spring. Shovelfuls can be dug into beds or placed around perennial plants as a top dressing or mulch. Note that compost is produced by the breaking down of plant residues and manure, and this break down will continue after you have added the compost to the soil – in other words, do as nature does and keep making more!
Harvesting – Deciding if your fruits and vegetables are ready to be eaten
Most vegetables are at their peak when harvested small. Young, tender carrots, for instance, taste much better than older, woody ones. If you are approaching the number of days to harvest for the variety, closely examine the crops and see if some specimens could not now be taken and enjoyed. Some plants have specific tests to see if they have reached maturity. For instance, a Hubbard squash is good for root cellar storage if the skin is tough. Try with your fingernail to make an impression in the skin. If you can’t, it is ready for long term storage. Cantaloupes are ripe for eating when gently sliding your thumb against the vine easily separates it from the melon. They also have a strong fruit odor. Watermelons are ready when they sound hollow or thud when you knock on them. Consult gardening books for other “Is it ready to eat?” tips.
Preserving your harvest
Canning – Preserve many garden products by canning in glass jars or tin cans. Some may be processed in boiling water baths while others must be canned in pressure cookers. The ultimate reference for canning is the Ball Blue Book, published by Alltrista Corp., Muncie, IN 47307-0729. Please consult modern tables for canning times and information as older material has been revised.
Root cellar – If your home has a basement, take one corner and build a root cellar. This should be an unheated area which can be kept dark and cool. Provide open rack shelving and slatted bins for storage of whole winter squash, onions, or potatoes. Provide a screened ventilation source and check the stored produce regularly to look for decay and signs of insect or mice damage. Put out traps if necessary, not poison, to protect your food supply.
Freezing – Many vegetables can be successfully frozen after a process known as blanching, in which the produce is immersed quickly into boiling water and then packed in plastic tubs or strong plastic bags.
Drying – Commercial, round, electric powered food dehydrators are readily available, often with additional drying racks. Many fruits and vegetables can be processed in this way and stored in a small space due to the reduction in bulk. Tomatoes for drying should be of the paste rather than beefsteak type. Dryers are ideal for preserving herb crops too. Weigh produce before drying and during the process to determine the percentage of water lost. Foods should be cooled and then stored in airtight containers when the required percentage of water has been driven off. See manufacturer’s directions. Solar dryers can be homemade, and home ovens can be used as dehydrators, too.
Saving seed for next year
If you want to save seed, there are several books available on the subject. You can learn how to keep plants pure so that their seeds run true-to-type, as growing parent plants properly is the key to producing good seed for subsequent years. As a very general rule for the beginning seed saver, note that any plant with the same Latin name as another plant has the ability to, and most likely will, cross pollinate. In layman’s terms, planting Hubbard True Green Squash (Cucurbita maxima) and Big Max pumpkins (also Cucurbita maxima) in the same garden means that you should not save seed from either as they are insect pollinated. In all likelihood, the bees that went to one plant’s flowers also went to the other one so you will have a crossed seed resulting. If the plants have different Latin names, like cucumbers (Cucumis sativus) and zucchini (Cucurbita pepo), they cannot cross. On the other hand, several varieties of self-pollinated plants like beans, peas, tomatoes, and lettuce can be grown together without too much fear of crossing. If in any doubt, please consult a book on this fascinating topic.
Having grown your vegetables for seed, select the best specimens from the best plants and let the fruit fully mature to ensure that the seed within is at its best, too. Cucumbers, for example, must be grown till well past their eating stage to grow seed useful for saving. Tomato, squash, pumpkin, melon, and cucumber seed all benefit from fermenting the seeds and the surrounding pulp for about three days before cleaning and then drying. The pulp should be put into a jar with a little water and shaken or stirred twice daily for three days. At the end of this time, the pulp and immature seeds will be floating on top as scum, and the mature and useful seeds will have sunk to the bottom. Take these and dry them on labeled paper plates for about two weeks before placing in a cool, dry place; for instance, in a bag or tub in the freezer, ready for planting next year.
Putting your garden to rest for the winter
Remove all crop residue and weeds from the entire garden and dump all in the compost bin. Anything left in the garden may harbor over-wintering insects which will be poised ready to attack your new crops in the Spring. If possible, plant the garden with a cover crop, especially annual ryegrass, before the first Winter frost. This will grow into a thick cover for the garden and protect the soil from erosion over the cold season. Otherwise, lay down a blanket of straw as mulch or even leaves collected in the Fall. These will cover the soil and break down before the next planting. Anything remaining in Spring can be raked up and put into the compost bin then.
Planning for next season
When planning locations of next year’s crops, rotate your rows or beds so that each vegetable is planted in a different location from what it was the previous year. Keep all your garden plans for a few years at a time to ensure you are holding to this rule.
Seed Starting Chart for Flowers
Follow the general seed starting directions above.
Flower Variety
Weeks before last spring frost to start plants indoors
Pansies; Poppies; Snapdragons;
12
Calendula;
6
Marigolds; Zinnias; Nasturtium; Morning Glories;
4
Planting and Growing Sunflowers
For giant-sized heads, space the plants at least three or four feet apart. Overcrowding will cause the plants to fall in heavy winds. In garden beds, the plants should be grown along a fence or property line. There are also dwarf and semi-dwarf varieties which may be grown in mixed flower beds. Some produce multiple flower heads on branching stems.
Planting and Growing Sweet Peas
These do best in cool summers and need cool moist weather to grow and flower well. Sow the seed outside as soon as the ground can be worked in Spring. Vining varieties, which may often reach 10 feet in height, should be planted about 3” apart and support provided. Bushy types should be planted with about 10” between plants. All types need to be repeatedly cut for bouquets as they will die once setting seed. Please note: plants, pods, and seeds of Sweet Pea flower are all poisonous.
Seed Starting Chart for Herbs
Follow the general seed starting directions above.
Herb Variety
Weeks before last spring frost to start plants indoors
Chives (Garlic and Onion); Oregano; Yarrow; Parsley;
The parable of the Prodigal Son is found in Luke 15:11-32.
Prodigal Son Story Summary
The story of the Prodigal Son, also known as the Parable of the Lost Son, follows immediately after the parables of the Lost Sheep and the Lost Coin. With these three parables, Jesus demonstrated what it means to be lost, how heaven celebrates with joy when the lost are found, and how the loving Father longs to save people.
Jesus was also responding to the Pharisees‘ complaint: “This man welcomes sinners and eats with them.”
The story of the Prodigal Son begins with a man who has two sons. The younger son asks his father for his portion of the family estate as an early inheritance. Once received, the son promptly sets off on a long journey to a distant land and begins to waste his fortune on wild living.
When the money runs out, a severe famine hits the country and the son finds himself in dire circumstances. He takes a job feeding pigs. Eventually, he grows so destitute that he even longs to eat the food assigned to the pigs.
The young man finally comes to his senses, remembering his father. In humility, he recognizes his foolishness and decides to return to his father and ask for forgiveness and mercy. The father who has been watching and waiting, receives his son back with open arms of compassion. He is overjoyed by the return of his lost son.
Immediately the father turns to his servants and asks them to prepare an enormous feast in celebration of his son’s return.
Meanwhile, the older son boiles in anger when he comes in from working the fields to discover a party with music and dancing to celebrate his younger brother’s return. The father tries to dissuade the older brother from his jealous rage explaining, “You are always with me, and everything I have is yours.”
Points of Interest From the Prodigal Son Story
Typically, a son would receive his inheritance at the time of his father’s death. The fact that the younger brother instigated the early division of the family estate showed a rebellious and proud disregard for his father’s authority, not to mention a selfish and immature attitude.
Pigs were unclean animals. Jews were not even allowed to touch pigs. When the son took a job feeding pigs, even longing for their food to fill his belly, it revealed that he had fallen as low as he could possibly go. This son represents a person living in rebellion to God. Sometimes we have to hit rock-bottom before we come to our senses and recognize our sin.
This section of Luke’s Gospel is dedicated to the lost. The first question it raises for readers is, “Am I lost?” The father is a picture of our Heavenly Father. God waits patiently, with loving compassion to restore us when we return to him with humble hearts. He offers us everything in his kingdom, restoring full relationship with joyful celebration. He doesn’t dwell on our past waywardness.
Reading from the beginning of chapter 15, we see that the older son is clearly a picture of the pharisees. In their self-righteousness, they refuse to associate with sinners and have forgotten to rejoice when a sinner returns to God.
Bitterness and resentment keep the older son from forgiving his younger brother. It blinds him to the treasure he freely enjoys through constant relationship with the father. Jesus loved hanging out with sinners because he knew they would see their need of salvation and respond, flooding heaven with joy.
Questions for Reflection
Who are you in this story? Are you a prodigal, a pharisee, or a servant? Are you the rebellious son, lost and far from God? Are you the self-righteous pharisee, no longer capable of rejoicing when a sinner returns to God?
Are you a lost sinner seeking salvation and finding the Father’s love? Are you standing to the side, watching and wondering how the Father could ever forgive you?
Maybe you’ve hit rock-bottom, come to your senses, and decided to run to God’s open arms of compassion and mercy? Or are you one of the servants in the household, rejoicing with the father when a lost son finds his way home?
Do you have any people in your life that might qualify to being like a prodigal son? I do! Many of us have kin, sons and daughters, husbands and wives, friends, who are like prodigals, waiting to come home and be forgiven for their lives of addiction and sin.
In fact, I am sitting here awaiting one of my kin to come to his senses, come home and find God. They need to come home and find their family still loves them and holds them in high regard. So I await, and thank God for the gift of patience and I shall continue praising God for his grace and compassion and the chance to give it to me kin.
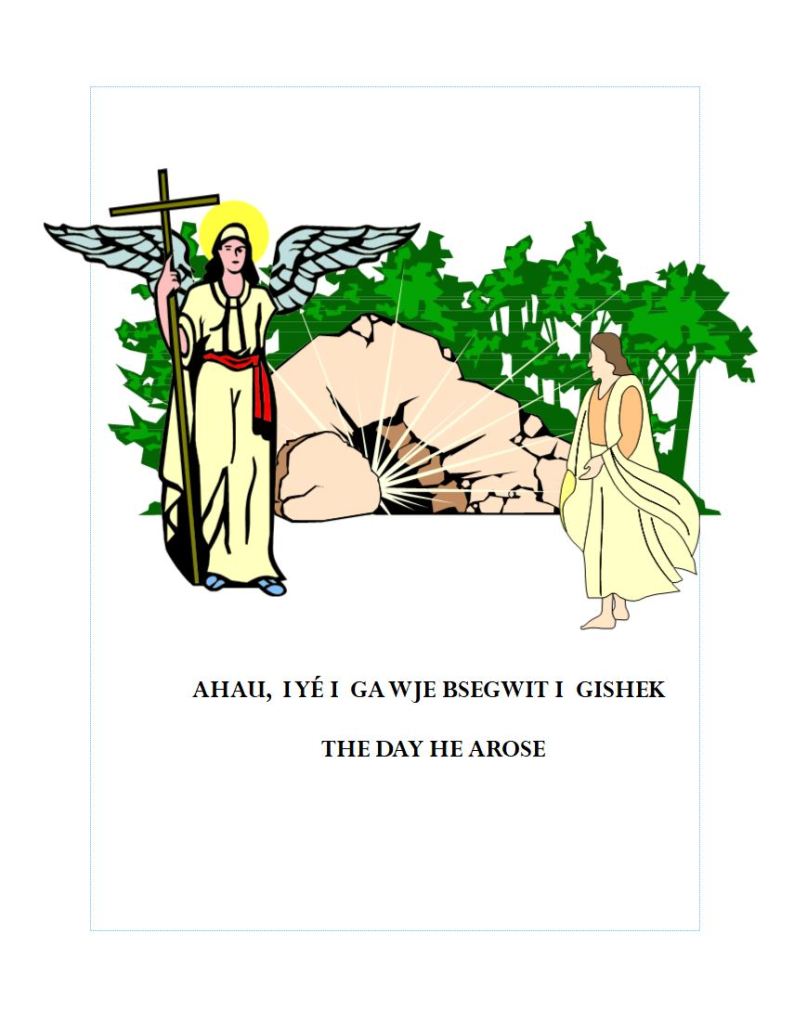
Mary Magdalene, Mary, & Salom walking up to the bright empty tomb of Jesus Christ early Sunday morning, Showing Golgotha in the background.
The empty tomb. All that is left for anyone to see. Many folks do not believe this happened but I believe and I have witnessed visions of this while I yet lived as a Medicine Man/Holy Man among my own Native peers.
I believe in several prophecies regarding the re-appearance of this man someday soon. They told us he would come back as Gatikneu or Gatikno, as the Spotted Eagle, which is a prominent prophecy among my people. It used to be told by many of the Elders when I was younger but I have not heard it repeated for quite a few years now.
I know several prophecies about this re-appearance and plan to teach on it during our regular classes coming in May. It is my belief the time of his re-appearing is very close and the Spotted Eagle will come to gather his feathers once again. And they shall be only the feathers which belong to him, not any other, no matter how beautiful they may be.
Epij mnogishget shote ngom gaga she nda je nbamadgeyan gechwa gche mnokmek
Emikwendeman ga kenomageyan dbekok enagdewendemyan enendemyek i ga kedyan
cho wika eyajmot weye ekigdoyan shote hau neshnabemok nda ked…….
Nin se Neaseno
It is a chore to post stuff and no one ever responds as sharing their thoughts and discussing something spiritual. A long time ago when I was still a boy, barely old enough to drive a car, we would sit in the late evening and discuss spiritual thoughts with one another. I learned a lot from many of the elders still alive at that time. Egi neshnabemoyak pene enendemyak mine anet gi kekyajek gi yajmowat ni atsokanen iw pi. gi gche medagwendan ga shewebziyak iw pi…..
My dear readers, I am facing a real challenge this week. The reading for the last week consisted of two Torah Portions, therefore I was supposed to comment on two Parashot, and not one. I did not have enough space for the second one, though, and therefore, the last Portion of Exodus is yet to be discussed. Meanwhile, we started not only a new Torah Portion, but a new Torah Book; and on the top of all that, the Passover – Pesach – is fast approaching (as some of you probably know). Therefore, I have a threefold task in this post: to comment on Pikudei (the last portion of Exodus), to discuss Vayikra (the first portion of Leviticus), and to share some thoughts regarding Pesach.
Pukidei
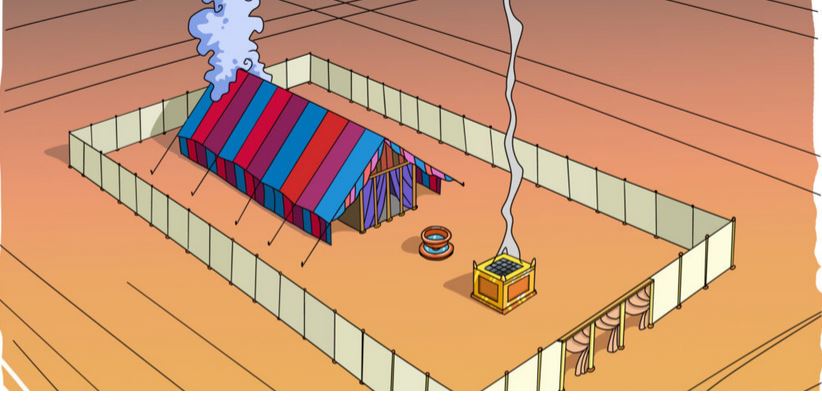
The final portions of the book of Exodus, in their entirety, describe the efforts of Moses and all the people of Israel in building the Tabernacle – the wonderful portable sanctuary that was to accompany the Jewish people throughout their long journey in the wilderness, and was to be set up in the Land of Israel when they finally arrived there. Finally, in the very last chapter, the concluding verses of the Book of Exodus inform us about the completion of this Sanctuary: “So Moses finished the work”[1]. What happens next?
“Then the cloud covered the tabernacle of meeting… And Moses was not able to enter the tabernacle of meeting, because the cloud rested above it“[2] A thick cloud covered the newly built Sanctuary. Because of this cloud, Moshe himself was unable to enter the Sanctuary. Can you imagine? After all the effort, which had gone into this building, it was covered by a cloud and seemed to be totally inaccessible and totally useless.
Yes, of course, everyone knows NOW that it was not just cloud: it was God’s glory! God’s presence covered the Sanctuary! However, think of that first moment when it happened: how could they know exactly what this cloud was? I am sure that Moses had faith, and didn’t doubt or question God, – but I am also quite sure that there were many there who were grumbling, wondering why in the world they had spent so much time building the very thing that now seemed to be so useless! It is always our choice: to praise God for His presence covering the Tabernacle – or to grumble about the untimely cloud, interfering with our plans.
Vayikra
In an amazing way – like everything in Torah – this choice is reflected by the very first word of our portion, “VaYikra”. I wrote about it already, but I think it’s worth mentioning every time we come to the Book of Leviticus – Vayikra. In the original Hebrew text, the first word of this Portion and of this Book – the word Vayikra– has a peculiar feature: it is written with a little aleph at the end. There are three sizes of the letters in Torah – intermediate, oversized and miniature – and every time we see a letter of a different size, we should look for a profound explanation. So, why do we have this miniature aleph here?
Our sages have offered different explanations, mostly to do with humility: they said that Moses had attained the highest level of humility, and it was expressed by the miniature aleph of Vayikra. There is, however, another explanation, that I love and always share. The word “VaYikra” without the aleph would read “VaYiker”, which means, “and it happened”. So, when we begin to read this book in Hebrew, we first read: “it happened”; but then we see this little Alef –and understand that the message here is completely different. There is a huge and truly ontological difference between the worldview based on Vayikra – “and He called”, and the worldview based on VaYiker – “and it happened”. A Jewish commentary says that when the Red Sea split, all the seas in the world split at the same time—because the Lord always leaves us a choice to perceive His miracles as some natural event that “just happened”. Once again, we always have this choice: to recognize the presence of God, the hand of God, the voice of God – or to see a cloud that ‘just happened’ to come at a bad time and became an unfortunate obstacle in our worship.
Preparing for Passover
Lately, I heard an interesting story. Some great rabbi in Israel (I won’t mention his name), while talking about cleaning his house for Passover (Nikayon Pesach), said, “However, the most important cleaning is of course the cleansing of the heart”. When asked, whether he knows who had said it before him, he answered: Of course! It was Paul! Thus, the Jewish rabbi knows about Paul and Paul’s exhortation to cleanse the hearts from the leaven; do the Christians readers know about Jewish Nikayon Pesach and Bedikat Hametz? When you read Paul’s words speaking of unleavened bread: “Purge out therefore the old leaven, that you may be a new lump, as you are unleavened.”[3] – do you know what the original background of this famous verse was?
A modern Christian reader would probably see in these words only spiritual reality: believers, being saved and purified from sin (leaven), become the unleavened bread. However, there is no doubt that while writing, Paul had in mind the Jewish Passover and that his words refer to a very practical bedikat chametz – the ceremony of “searching for leaven”. This ceremony probably existed in the time of Jesus, and it still exists in Jewish homes today, both in Israel and in the dispersion: after weeks of thorough cleaning (Nikayon Pesach), on the evening before Passover, the entire house would be solemnly inspected for any occasional crumbs of leaven. Here is what David Baron writes: “I well remember the interest with which as a boy I used to follow about my father on the evening before 14th of Nisan… after uttering the prayer: “Blessed are you the Lord our God, who has sanctified us by Your commandments and commanded us to remove the leaven”, he proceeded to search all the likely and unlikely places all over the house for leaven”. This ceremony, completing the cleaning of the house, has always been considered necessary and final preparation for the Feast. Undoubtedly, Paul’s words refer to this custom – however, as it happens often in the New Testament, Paul reveals a new spiritual layer beyond the traditional custom.